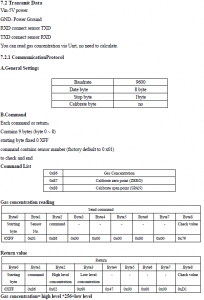
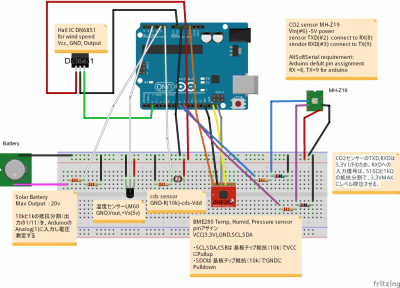
中国製のMH-Z19赤外線co2センサー用を$24で購入。
Arduinoで測定できるようにした。
MH-Z19にはPWMとUARTの信号端子がある。
定時観測のためにはArduinoとはUARTでのデータのやり取りが必要だが、センサーのTXD、RXD端子を、誤ってArduinoのTXD,RXDにそれぞれつないでいたため通信できず。。。
気がつくまでに1日もかかり、その結果動作プログラムの完成に2日間費やしてしまった。
以下必要な手順を記す:
1、SoftwareSerial Libraryを準備
ArduinoのSoftwareSerial でなく、AltSoftSerial Libraryを活用
SoftwareSerial Library
AltSoftSerial Library
Basic Usage
AltSoftSerial mySerial;
Create the AltSoftSerial object. Only one AltSoftSerial can be used, with the fixed pin assignments shown
above.mySerial.begin(baud);
Initialize the port to communicate at a specific baud rate.
mySerial.print(anything);
Print a number or text. This works the same as Serial.print().
mySerial.available();
Returns the number of bytes received, which can be read.
mySerial.read();
Reads the next byte from the port. If nothing has been received, -1 is returned.
Example Program
#include <AltSoftSerial.h>

AltSoftSerial altSerial;

void setup() {
  Serial.begin(9600);
  Serial.println("AltSoftSerial Test Begin");
  altSerial.begin(9600);
  altSerial.println("Hello World");
}

void loop() {
  char c;

  if (Serial.available()) {
    c = Serial.read();
    altSerial.print(c);
  }
  if (altSerial.available()) {
    c = altSerial.read();
    Serial.print(c);
  }
}
|
| Board | Transmit Pin | Receive Pin | Unusable PWM |
|---|---|---|---|
| Arduino Uno, Duemilanove, LilyPad, Mini (& other ATMEGA328) |
9 | 8 | 10 |
2、UART通信
下記のURLのProgramを参考に、UART通信のProgram作成
CO2センサーから9バイトデータを読み込み、データ計算
センサーのTXD,RXDは3.3V I/Fのため、RXDへの入力信号は、510Ωと1kΩの抵抗分割で、3.3VMAXにレベル降圧させる。
arduino-esp8266-mhz-19-serial/arduino-esp8266-mhz-19-serial.ino
2017-10-09追加 mh-z19b-co2-ver1_0
3、UART通信のProgram:
// command to ask for data
byte cmd[9] = {0xff, 0x01, 0x86, 0x00, 0x00, 0x00, 0x00, 0x00, 0x79};
//char buff[9]; // for answer
byte buff[9]; // for answer
co2Serial.write(cmd, 9); //request PPM CO2
if (co2Serial.available())
{
for(n = 0; n<=8; n++) {
buff[n] = co2Serial.read();
delay(100);
}
}
for(n=0; n<=8; n++) {
Serial.print(“n=”);
Serial.print(n);
Serial.print(” DEC=”);
Serial.print(buff[n]);
Serial.print(” HEX=”);
Serial.println(buff[n],HEX);
}
if (buff[0] != 255)
{
Serial.println(“Wrong starting byte from co2 sensor!”);
}
if (buff[1] != 134)
{
Serial.println(“Wrong command from co2 sensor!”);
}
int ppm = 256 * buff[2] + buff[3];
Serial.print(“ppm=”);
Serial.println(ppm);
Serial.println(“ppm ————— “);
———————————————————


esp8266でも測定できました。参考スケッチです。
#include
#define ESP8266_USE_SOFTWARE_SERIAL
#define MH_Z19_RX D7 // conect to TX pin of MH-Z19
#define MH_Z19_TX D6 // conect to RX pin of MH-Z19
//SoftSerial co2Serial; // define MH-Z19
SoftwareSerial co2Serial(MH_Z19_RX,MH_Z19_TX);
/////////////////////////////////
void setup() {
Serial.begin(9600);
while (!Serial) ;
delay(1000);
Serial.println(“Setup started”);
unsigned long previousMillis = millis();
co2Serial.begin(9600); //Init sensor MH-Z19(14)
delay(1000);
}
//// parameters for CO2 sensor
int i;
int n ;
int ppm;
/////////////////////////////////////////////////
void loop()
{
co2sensor_read();
Serial.print(“ppm=”);
Serial.println(ppm);
Serial.println(“ppm ————— “);
delay(5000);
i++;
}
/////////////////////////////////////////////////
void co2sensor_read()
{
for (i=1;i<=3;i++)
{
byte cmd[9] = {0xff, 0x01, 0x86, 0x00, 0x00, 0x00, 0x00, 0x00, 0x79}; // command to ask for data
//char buff[9]; // for answer
byte buff[9]; // for answer
co2Serial.write(cmd, 9); //request PPM CO2
if (co2Serial.available()) {
//buff[9] = co2Serial.read();
//Serial.println(buff[9]);
for(n = 0; n<=8; n++) {
buff[n] = co2Serial.read();
delay(100);
}
}
for(n=0; n<=8; n++) {
Serial.print("n=");
Serial.print(n);
Serial.print(" DEC=");
Serial.print(buff[n]);
Serial.print(" HEX=");
Serial.println(buff[n],HEX);
}
if (buff[0] != 255)
{
Serial.println("Wrong starting byte from co2 sensor!");
}
if (buff[1] != 134)
{
Serial.println("Wrong command from co2 sensor!");
}
ppm = 256 * buff[2] + buff[3];
// Serial.print("ppm=");
// Serial.println(ppm);
Serial.println("ppm ————— ");
}
delay(500);
}
センサーの取説も更新されていました。
http://www.winsen-sensor.com/d/files/infrared-gas-sensor/mh-z19b-co2-ver1_0.pdf